At this age, it is important that children achieve proper crayon handling in order to improve fine motor skills. One was of achieving this goal is simply by giving the child blank papers and colours so that they can colour without boundaries, gaining practice in handling the colour while stimulating their creativity.

Activity 2
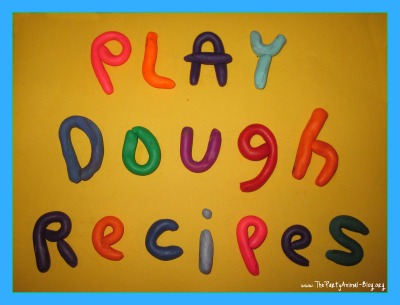
Children in the class are exposed to play-dough, which is home-made. With play-dough, children improve hand movement, enhance fine-motor skills and enjoy being creative. It's different from plasticine since it's softer, easier to handle and less messy!
Here is an easy recipe that we use. The most difficult ingredient to find is the cream of tartar. However, most leading supermarkets have it. Some people substitute cream of tartar for lemon drops.
Ingredients
- 1 cup flour
- ½ cup salt
- 2 tsps cream of tartar (or 1/4 tsp of lemon juice)
- 1 cup water
- 1 tbsp oil
- Food coloring
Method:
First, combine flour, salt and cream of tartar in a saucepan. Mix liquids and gradually stir them into the dry ingredients. When the mixture is smooth, cook over medium heat, stirring constantly until a ball forms. Remove from heat and knead until smooth. Store in a closed bag or stretch and seal.

Activity 3
Police Notepad Instructions

Items Needed:
-Blue Construction Paper
-White Letter Paper
-Pipe Cleaner
-Scissors
-Black Marker
-Hole Punch (optional)
Instructions:
-Draw a star on the blue construction paper as large as you want the notepad.
-Fold the paper and then cut out 2 stars.
-Cut out the same star pattern on as many white letter papers as you want in your notepad.
-Put one blue star on top of the white letter paper and one blue star behind the white letter paper.
-If you have a hole punch, use it to punch out 2 holes at the top of one of the points of the star. If not, just use the scissors to make a hole large enough to put pipe cleaner through.
-From the back, put the pipe cleaner through one hole bringing it to the front and then in the other hole, bring the pipe cleaner to the back. Twist the 2 ends of the pipe cleaner together.
-Using the black marker, write "POLICE" on the front of the star. If you have letter stencil's you can use those, but letting your child write police by themselves, give this craft something a little special.
Activity 4
Dog Sock Puppet Instructions

Items Needed:
-White Sock
-Black Construction Paper (or black felt)
-Pink Construction Paper (or pink felt)
-small brown pom pom
-2 wiggly eyes
-Black Marker
-Scissors
-Glue
Instructions:
-Cut out 2 ears out of the black construction paper.
-Cut out a tongue out of the pink construction paper. Use the black marker and make a line down the middle of the tongue.
-Place the sock on your hand. Fold your hand in half. Glue the eyes on the top of the sock. Glue the pom pom on the tip of the sock for the nose. Glue the ears on either side of the eyes. Open up your hand, and in the middle of your palm, glue the tongue
Activity 5
Love doorhanger
What you'll need: - 1-2 pieces of red craft foam
- 1 piece of white craft foam
- 1 piece of pink craft foam
- White ribbon
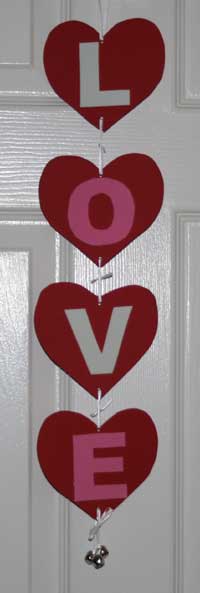
- 3 jingle bells
- Hole punch
- Glue
- Heart Template
- Letter Templates
How to make your love door hanger craft:
- Print out the template and cut out the pieces. Trace the heart shape onto red craft foam. You will need 4 red hearts. Trace the letters "L" and "V" onto white craft foam and the "O" and "E" onto pink craft foam. Cut out all of these pieces.
- Glue one letter onto each heart.
- Punch a hole in the top and bottom of each heart (in the center of the top of the heart and the center of the very bottom of the heart).
- Cut small pieces of ribbon (3-4 inches) and use the ribbon to tie the bottom of one heart to the top of the next in order so you spell out the word "LOVE". At the top of the "L" heart use a longer piece of ribbon to use as a hanger. At the bottom of the "E" heart thread 3 jingle bells onto the ribbon and then tie it onto the heart.
- Hang your craft on the door.
Stained Glass Butterflies
Spring has finally hit, so bring on the butterfly crafts !

This adorable craft is super easy for the kiddos, minimal work for the mamas and requires very little supplies. . . black construction paper, different colored tissue paper and a glue sticks. Simple enough right ? ?
First off have your little one put glue all along the butterfly outline. and proceed to put four pieces of tissue paper on. . at this point don't worry about the tissue paper hanging off the edges, I found a butterfly template online, printed it out and traced that onto four pieces of paper, than I shrunk it and traced the smaller one onto another four pieces of paper.
Last night while the little ones were sleeping I cut out the butterflies and 16 pieces of tissue paper. 

just make sure its stuck on there good.


After they were done putting their tissue paper on, I cut off all the excess paper hanging off the edge. Don't worry about it not looking pretty.
 Next take the other butterfly you cut out and lay that over the side of the butterfly you just trimmed the tissue paper off of. If you need to trim off an other little pieces.
  Finally, display proudly and beautifully in your window.
Love it ! !
 Activity 7
 PAPER CUP CHICK
Materials:
yellow paper cup
scissors
white glue
google eyes
orange, yellow construction paper
optional: pink construction paper, feathers, green pipe cleaner
There are a couple different options for your little paper cup chicks. We will give you instructions for the basic paper version. (Adding feathers is as simple as gluing them on instead of using construction paper.)
- Cut yellow construction paper into strips about two inches wide. Have your child cut a fringe on one side of the construction paper (to represent feathers). This is a great first cutting project since the kids practice the hand motion of opening and closing the scissors. My two year olds cut all the fringe on our project.
- With the cup upside down, glue on the strips of fringe yellow to the cup
- Out of Yellow Construction paper - Cut an oval or circle for the face. (You can trace the bottom of the cup or free draw an oval)
- Cut an oval for the wings - now cut that oval in half to create a pair of wings
- Cut a small orange triangle for the beak
- Cut an orange heart for the feet. Now cut little triangles to make the "toes"